macOS Sonoma, the latest iteration of Apple’s operating system, promises exciting new features and performance enhancements. But what if your trusty Mac doesn’t officially support this upgrade?
Fear not, tech-savvy users!
This guide explores the Hackintosh approach, allowing you to install Sonoma on older Macs using OpenCore Legacy Patcher. However, proceed with caution as this method involves modifying system files and carries inherent risks.
Before diving in, it’s crucial to check the Sonoma compatibility list. Ensure your Mac meets the minimum hardware requirements to avoid potential issues down the line. Resources like online forums and communities can also offer valuable insights and support.


Essential Tools:
- A compatible Mac: Refer to the official Sonoma compatibility list.
- USB flash drive (16GB or more): This will house the bootable installer.
- OpenCore Legacy Patcher: Download from a reputable source (not linked here due to potential copyright concerns).
- A Mac that already runs a supported version of macOS: You’ll need this to download the Sonoma installer.
Disclaimer: This guide is for informational purposes only and should not be considered official advice. Modifying system files can lead to unexpected behavior or permanent damage to your Mac. Proceed with caution and at your own risk.
Step to Install macOS Sonoma on Unsupported Mac Easily
Table of Contents
- 1 Step to Install macOS Sonoma on Unsupported Mac Easily
- 2 Watch the step-by-step Guide to macOS on Unsupported Mac
- 3 FAQs
- 3.1 Is it safe to install macOS Sonoma on an unsupported Mac?
- 3.2 What are the benefits of installing macOS Sonoma on an unsupported Mac?
- 3.3 What are the risks of installing macOS Sonoma on an unsupported Mac?
- 3.4 What should I do before attempting to install macOS Sonoma on an unsupported Mac?
- 3.5 Where can I find help if I encounter issues during the installation process?
Note: Installing Sonoma on an unsupported Mac is an advanced procedure and carries inherent risks. It’s crucial to weigh the potential benefits against the risks before proceeding. Consider seeking help from experienced users or professionals if you’re unsure about any steps.
Step 1. Download OpenCore Patcher
What is OpenCore Patcher?
It is an open-source tool designed to enable the installation and operation of macOS on unsupported hardware, particularly older Apple Macs that are no longer officially supported by Apple for the latest macOS versions.
Some Key Features:
- Functionality: OCLP helps bridge the gap between unsupported hardware and desired macOS versions by providing customizable patches that address compatibility issues. These patches essentially adjust how the operating system interacts with the specific hardware, allowing for a potentially functional installation.
- Target Audience: OCLP primarily caters to users with older Macs who want to experience the latest macOS features or extend the life of their existing devices.
How to Download OpenCore Patcher?
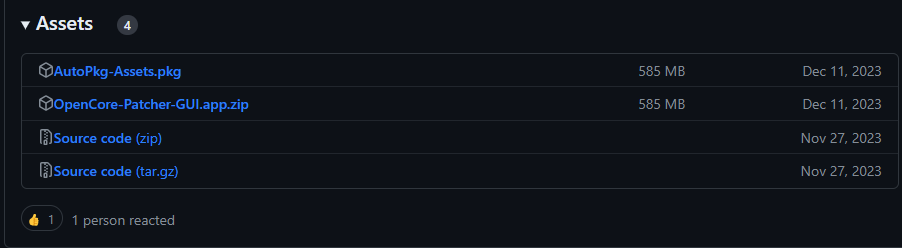
Open the below Github link, under the assests, click on OpenCore-Patcher-GUI.app.zip to download.
Step 2. Create a macOS Bootable Installer
Begin by connecting the USB flash drive to a free port on your computer. Once securely inserted, navigate to the location where the OpenCore application is stored on your computer. Open the OpenCore application to proceed with the next steps.
Please Follow the below steps once the OpenCore is launched.
- Connect your USB flash drive to your computer and ensure it is at least 16GB and backup your Data.
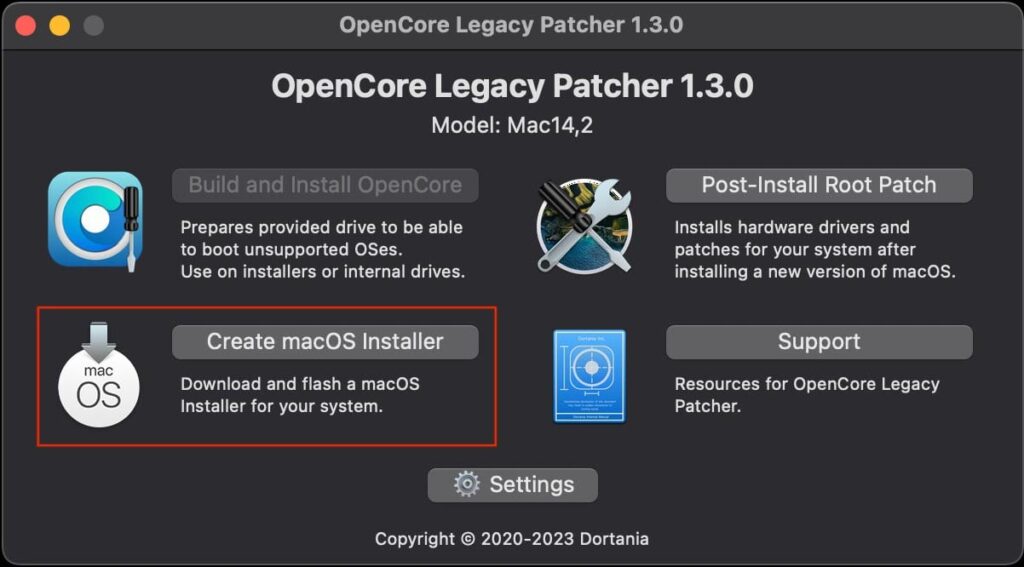
- Launch OpenCore Legacy Patcher. You can usually find it in your Applications folder.
- Click on “Create a macOS Installer” on the main screen.
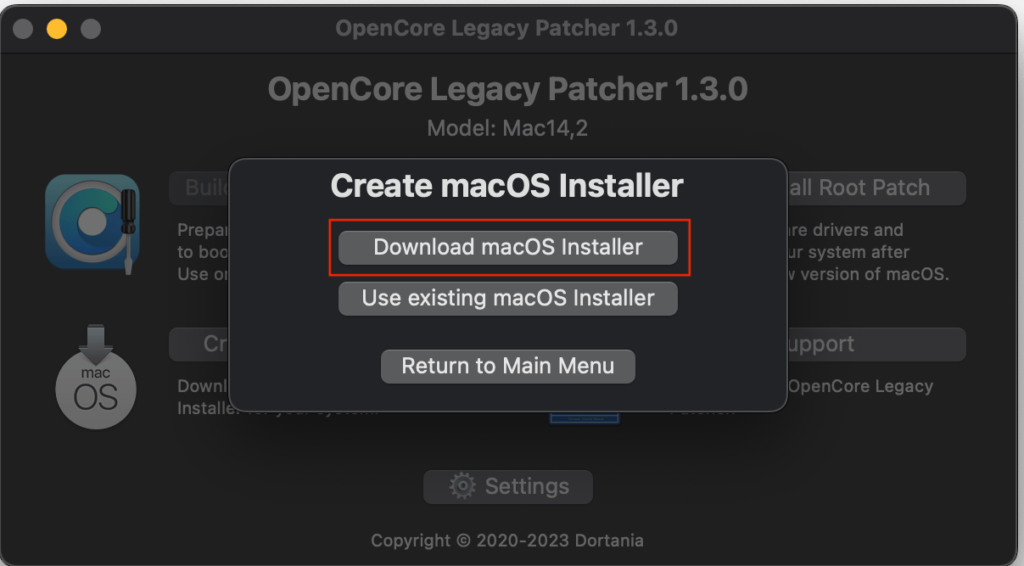
- Choose the download method:
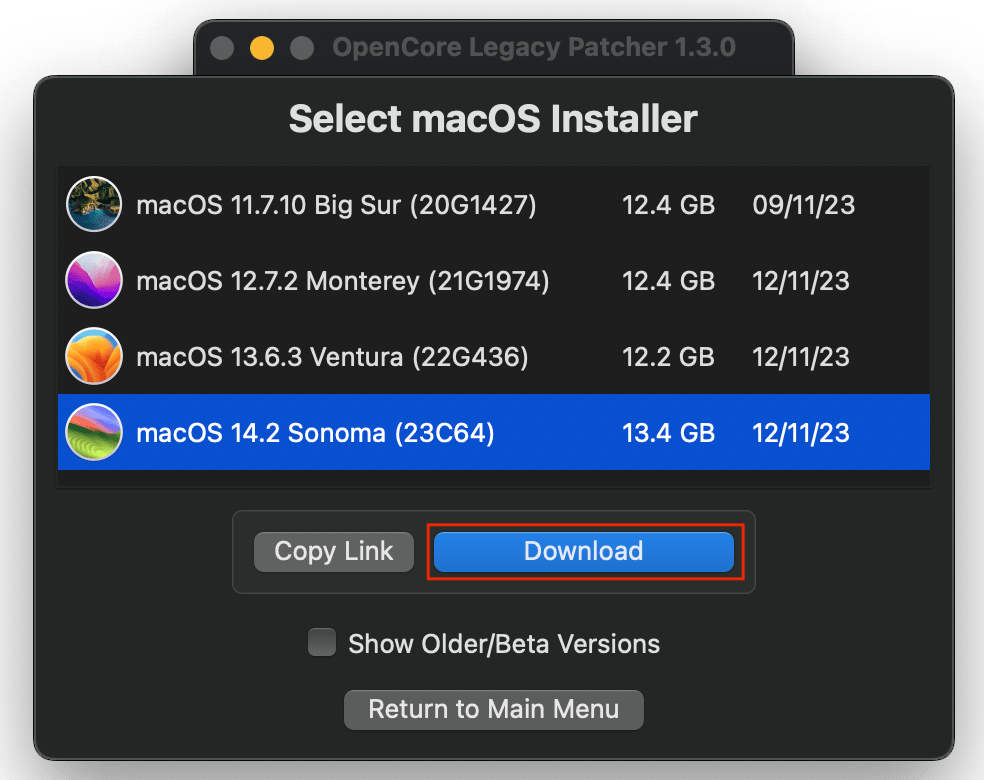
- Download macOS Installer: If you haven’t downloaded the macOS Sonoma installer yet, select this option. OpenCore will guide you through the download process.
- Use existing macOS Installer: If you already have the downloaded macOS Sonoma installer file on your computer, select this option and locate the file using the file selection dialog.
- Follow the on-screen prompts: Once you’ve chosen the download method, OpenCore will either download the installer or prompt you to select the existing installer file. Wait patiently for the download or validation process to complete.
- Confirm the creation of the bootable installer: When prompted, click “Yes” to allow OpenCore to create a bootable macOS Sonoma installer on your chosen USB disk.
- Select the installation source: Choose the downloaded macOS Sonoma installer file.
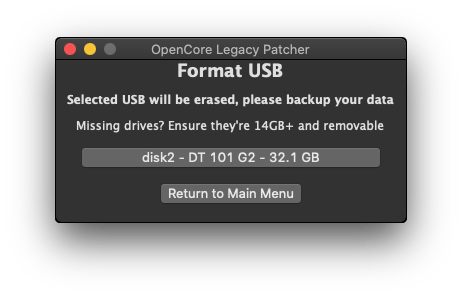
- Choose your USB disk: A list of available disks will be displayed. Carefully select the USB drive you want to use. Make sure to choose the correct drive to avoid accidentally erasing data on other drives.
- Click “Confirm” to start the creation process. OpenCore will format the USB drive and copy the necessary files to create a bootable installer. This process may take some time, so be patient.
- Congratulations! Once the process is complete, you will have a bootable USB drive containing the macOS Sonoma installer.
Before getting away!!! Don’t close the OpenCore window as we are following in the Step 3.
Step 3. Installing OpenCore
The final step involves installing OpenCore onto the newly created bootable USB drive. This enables OpenCore’s functionalities to facilitate the macOS Sonoma installation process.
- On the final screen of “Creating a Bootable USB for macOS Sonoma,” you’ll be prompted with the question: “Would you like to continue and Install OpenCore to this Disk?” Select “Yes” to proceed.
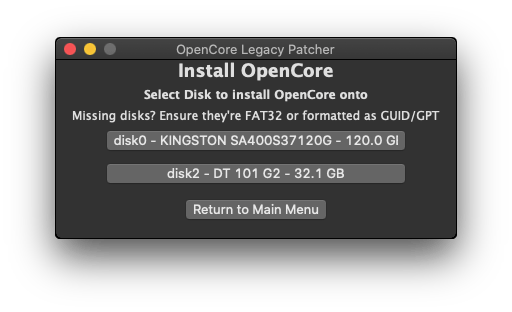
- A new window will appear asking you to “Install to Disk” again. This step confirms your intent to install OpenCore onto the bootable USB drive you just created.
- Select the USB drive you used in the previous step to create the bootable installer. Ensure you choose the correct drive to avoid unintended consequences.
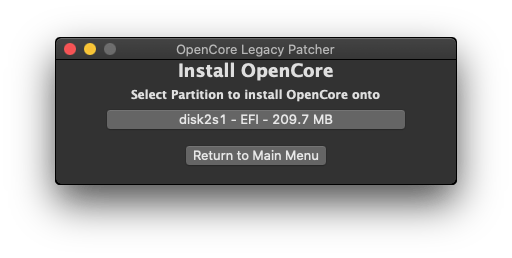
- Next, select the “Disk with EFI” partition. This is typically a small partition on the USB drive used for storing configuration files.
- Enter your administrator password when prompted. This is necessary to grant OpenCore the necessary permissions to modify the USB drive’s EFI partition.
- Congratulations! You’ve successfully installed OpenCore onto your bootable USB drive.
Step 4. Restarting Mac to Startup Manager
Once you’ve completed the previous steps and have a bootable USB drive with OpenCore installed, it’s time to begin the actual macOS Sonoma installation process.
- Perform a system restart: Power down your Mac and then turn it back on.
- Hold down the Option key immediately after hearing the startup chime. This key combination triggers the boot selection menu.
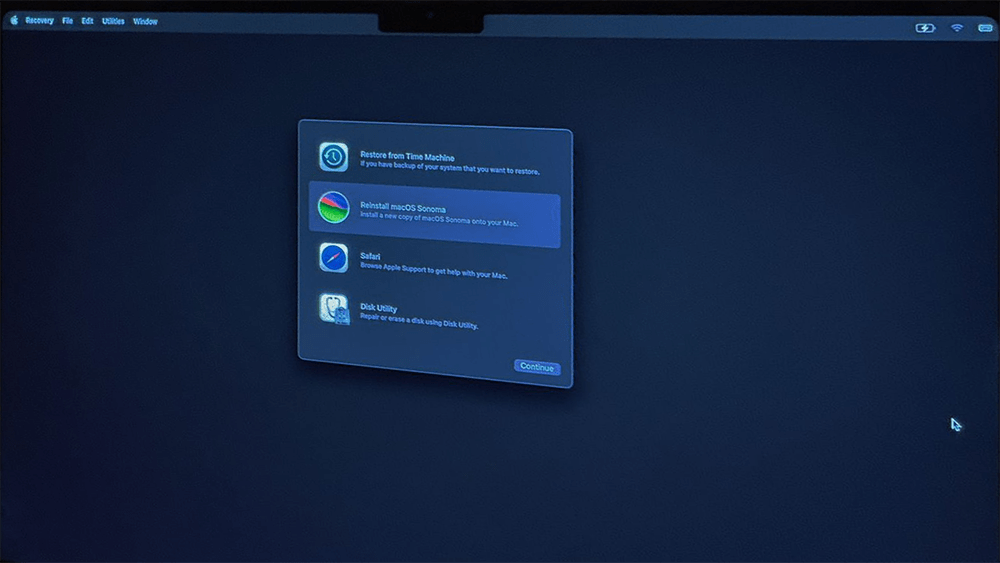
- In the boot menu, select the “EFI Boot” option. It might appear with an OpenCore logo or the name of your USB drive.
- Once the boot selection is confirmed, the macOS Sonoma installer will launch or you can go to the Disk Utility and perform a clean Installation. It is rather up to you to decide.

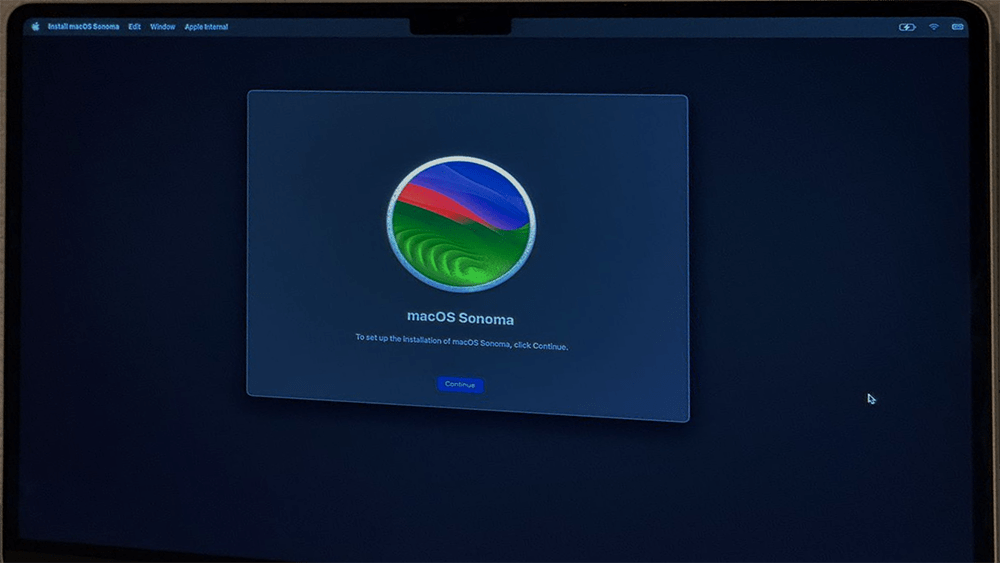
Step 5. Install macOS Sonoma
Once you’ve chosen your preferred installation path (either with data preservation or using Disk Utility for a clean install):
- Click “Continue” to proceed with the installation process.
- Carefully review the macOS Sonoma license agreement.
- Select the target disk where you want to install macOS Sonoma. This will typically be your Mac’s internal storage drive.
- Click “Continue” once you’ve chosen the installation disk.
- The installation process will now begin. The estimated time may vary depending on your hardware configuration and chosen installation option. Be patient and avoid interrupting the process once it starts.
Important Note:
- During the installation, your Mac might restart several times. This is normal behavior and does not indicate any issues.
- Do not power off or disturb your Mac while the installation is in progress. This could lead to unexpected errors or incomplete installations.
Step 6. Quick Mac setup for new user
After a successful installation, your Mac will automatically reboot and initiate the final setup process for macOS Sonoma. This involves various steps to personalize your user experience and connect to essential services. Here’s a breakdown:
- Choose your preferred country: Select the country where you reside from the provided list. This will influence certain settings and features tailored to your region.
- Select your preferred language: Choose the language you want to use for the system interface, menus, and applications.
- Continue with Accessibility options.
- Connect to the internet: Establish a connection to your Wi-Fi network or wired internet connection. This allows you to download additional software updates, access online services, and activate your Apple ID (if applicable).
- Follow the remaining on-screen prompt: The setup process might guide you through additional steps such as creating a user account, setting up iCloud, and configuring security settings.
Step 7. Post Installation configuration
After successfully logging into your macOS Sonoma interface, you might encounter a pop-up notification from OpenCore Legacy Patcher. This message indicates that your system is currently booting from a USB or external drive.
The notification offers you the convenience of installing OpenCore directly onto your internal hard drive, allowing you to boot macOS normally without needing the external drive plugged in.
Here’s a step-by-step guide to installing OpenCore onto your internal drive:
- Click “OK” on the OpenCore Legacy Patcher pop-up window.
- In the subsequent window, click “Install to Disk“.
- Select your Mac’s internal hard drive from the available options.
- Choose “EFI disk 0” from the list of partitions.
- Enter your administrator password when prompted.
- Reboot your Mac for the changes to take effect.
Watch the step-by-step Guide to macOS on Unsupported Mac
FAQs
What are the benefits of installing macOS Sonoma on an unsupported Mac?
The primary benefit is gaining access to the latest features and functionalities of macOS Sonoma on a device that Apple no longer officially supports.
What are the risks of installing macOS Sonoma on an unsupported Mac?
Potential risks includes System instability, Data loss and sometimes Hardware damage.
What should I do before attempting to install macOS Sonoma on an unsupported Mac?
Check compatibility, Back up your data and Research and understand the process.
Where can I find help if I encounter issues during the installation process?
Online communities like MacRumors, Apple Insider, forums.developer.apple.com, reddit etc are the places where you can get help.