How to install macOS Sonoma on VirtualBox on Windows 10/11. Apple’s new operating system for Mac is macOS Sonoma or macOS 14. This operating system is named after a city in California. They announced it at the WWDC event of 2023, Apple released the developer beta of macOS Sonoma on 5 June 2023. At the WWDC event, Apple announced they would release the public beta sometime in July. And the final stage will be released in September 2023.
If you also have VirtualBox on your Windows 10/11 computer, you could install macOS Sonoma. And if you wanted to install macOS Sonoma on VirtualBox on Windows 10/11. Then you are in the right place this article will show in detail how to install macOS Sonoma on VirtualBox on Windows 10/11.
Compatible Macs for macOS Sonoma
Table of Contents
- 1 Compatible Macs for macOS Sonoma
- 2 macOS Sonoma
- 3 Requirements to install macOS Sonoma on a VirtualBox on Windows 11
- 4 Steps to install macOS Sonoma on VirtualBox on Windows 10/11
- 5 Step 2. Create macOS Sonoma Virtual Machine and configure it
- 6 Step 3. Run VirtualBox code on Command prompt.
- 7 Step 4. Start your macOS Sonoma Virtual Machine
- 8 Conclusion
- MacBook Pro: 2018 and later
- MacBook Air: 2018 and later
- Mac Mini: 2018 and later
- iMac: 2019 and later
- iMac Pro: 2017
- Mac Studio: 2022 and later
- Mac Pro: 2019 and later
macOS Sonoma
Apple has introduced some interesting and new features to it. One of them is Widgets on the Desktop before the release of macOS Sonoma you were limited to using the notification sidebar on the right side. But with the release of macOS Sonoma, you could now have the widgets anywhere you want. And the widget will match your wallpaper. And the second new feature is gaming mode although Macs are not used for games with this feature, you can now play games on your Mac. This new feature will allow you to play games with the highest frame rate and catches up with the hardware components for MacBook Machine.


Another amazing feature is that you can create a private Safari Profile. With this feature, you could have a separate browsing history with the same Apple ID. And also you could search anything securely and would have a separate browsing history, cookies, favorites, and extensions. This time Apple has enhanced video conferencing, in macOS Sonoma you could have a call with the highest performance rate. Also, you could screen-share your screen while on a call.
Requirements to install macOS Sonoma on a VirtualBox on Windows 11
if you want to download macOS Sonoma on a VirtualBox on Windows 11. You have to install the things from the links below;
Steps to install macOS Sonoma on VirtualBox on Windows 10/11
Step 1. Install VirtualBox and its extension pack
Oracle VM VirtualBox is developed by Oracle Corporation as a free and open-source virtualization framework. VirtualBox allows you to install another operating system which we call the host operating system. And your main operating system will remain the same. So this means that if you are having a Windows computer you can install and use macOS in your VirtualBox on a Windows computer.
VirtualBox also offers you the same features as the physical computer like its own CPU, memory, etc. You could also create your Virtual Machine. VirtualBox is widely used to install other operating systems on it. But also you could use it to test apps or OS that are still in its developer beta form.
Steps to install VirtualBox:
- Navigate where you have downloaded the VirtualBox and double-click on the file.
- Then Oracle VM VirtualBox setup window will appear, click on Next.
- Choose the place where you would like to install VirtualBox and click Next.
- Click Next.
- Click Yes and click Install to begin the installation process.
Steps to install VirtualBox extension pack
- Double-click on the VirtualBox extension pack and click on Install.
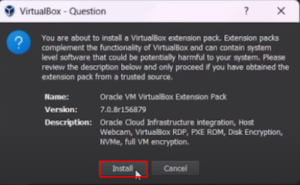
2. Scroll down and click on I agree.

3. And your VirtualBox extension pack is successfully installed. Click Ok.
Step 2. Create macOS Sonoma Virtual Machine and configure it
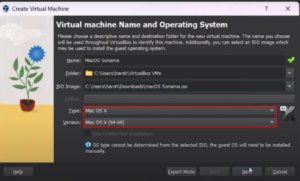
4. Launch the VirtualBox and click on New from the right top corner.

5. On the next window click on the Expert mode.
6. Then enter a name for the virtual machine, and select the type as macOS X and version as macOS X (64-bit), also specify the location.
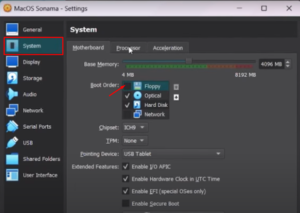
7. From the Hardware section increase the Base Memory and Processor.

8. Then select the maximum disk size for your macOS Sonoma. And specify the location, click Finish.

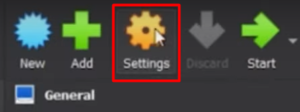
9. Click on the Settings to customize some certain things.
10. And on the next windows click on System and uncheck the floppy disk.
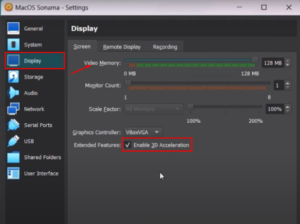
11. Click on the Display section and select the display as 128 MB.
12. Click on the Storage section and click on Empty>Disk icon>Choose a File.
13. Select the macOS Sonoma ISO image and click Open.
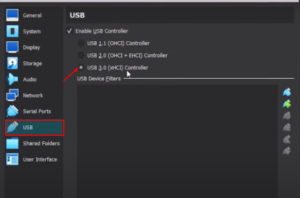
14. Form the USB section enable the USB 3.0.
15. Click Ok.
Step 3. Run VirtualBox code on Command prompt.
So now that you have customize your Virtual Machine it is time to run some codes to install macOS Sonoma. So first, you have to notice your Virtual Machine name because we will use it later on.
Note: It is highly recommended that you should quite the VirtualBox program before executing the codes. Otherwise, your Virtual Machine might not proceed to installation process.
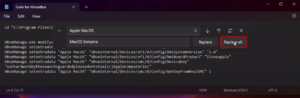
- First, you have to open the VirtualBox code and click on Edit and select replace all.

2. Then replace VM Name with your Virtual Machine name and click on Replace all.
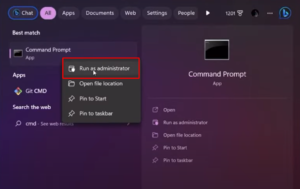
3. Open the Windows menu tab and search for CMD and click run as administrator.
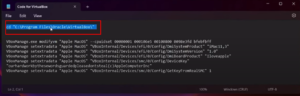
4. Now copy the first line of the commands and paste it into Command prompt windows and click enter. And copy the rest of the commands and paste it then click Enter.
Step 4. Start your macOS Sonoma Virtual Machine
- First, open the VirtualBox and click on Start and a sets of codes will run for 90 seconds.

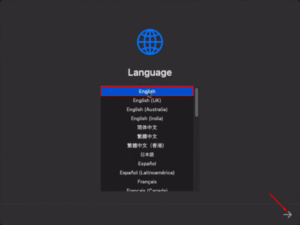
2. And then wait till you see an Apple Logo and select your language and click on the Arrow icon.
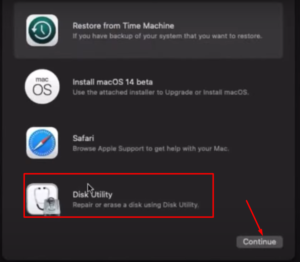
3. Select the Disk utility and click Continue.
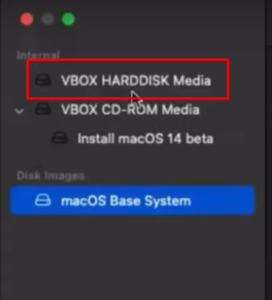
4. Choose VBOX HARDDISK Media and click Erase.
5. Configure the settings and click on Erase.

6. Click Done.
7. Then click on the Disk utility and click on quit Disk Utility.
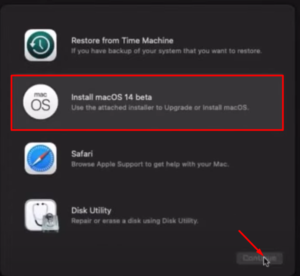
8. Click Reinstall macOS Sonoma beta and click Continue.
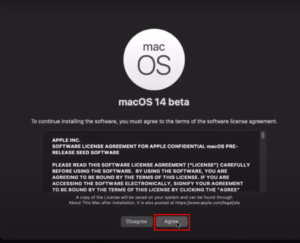
9. On the next page click on Agree and again click on Agree.
10. Select the macOS Sonoma hard disk and click on Continue.
11. Now you have to wait patiently for 40 t0 60 minutes depending on the speed of your PC.
Conclusion
In this article, we showed you how to install macOS Sonoma in VirtualBox in Windows 10/11. I hope this guide solved your problem. And provided you with what you were looking for. I hope you will not face any problem or difficulty while doing it yourself. But if you had any questions or suggestions then feel free to tell us in the comment section. We would love to hear from you.
Download macOS Ventura ISO image